Flow Design
The Flow Designer
The flow designer is a graphical interface for designing flows for service numbers. In the left-right view, the nodes are compact, showing only the node type, name and links directly in the canvas:
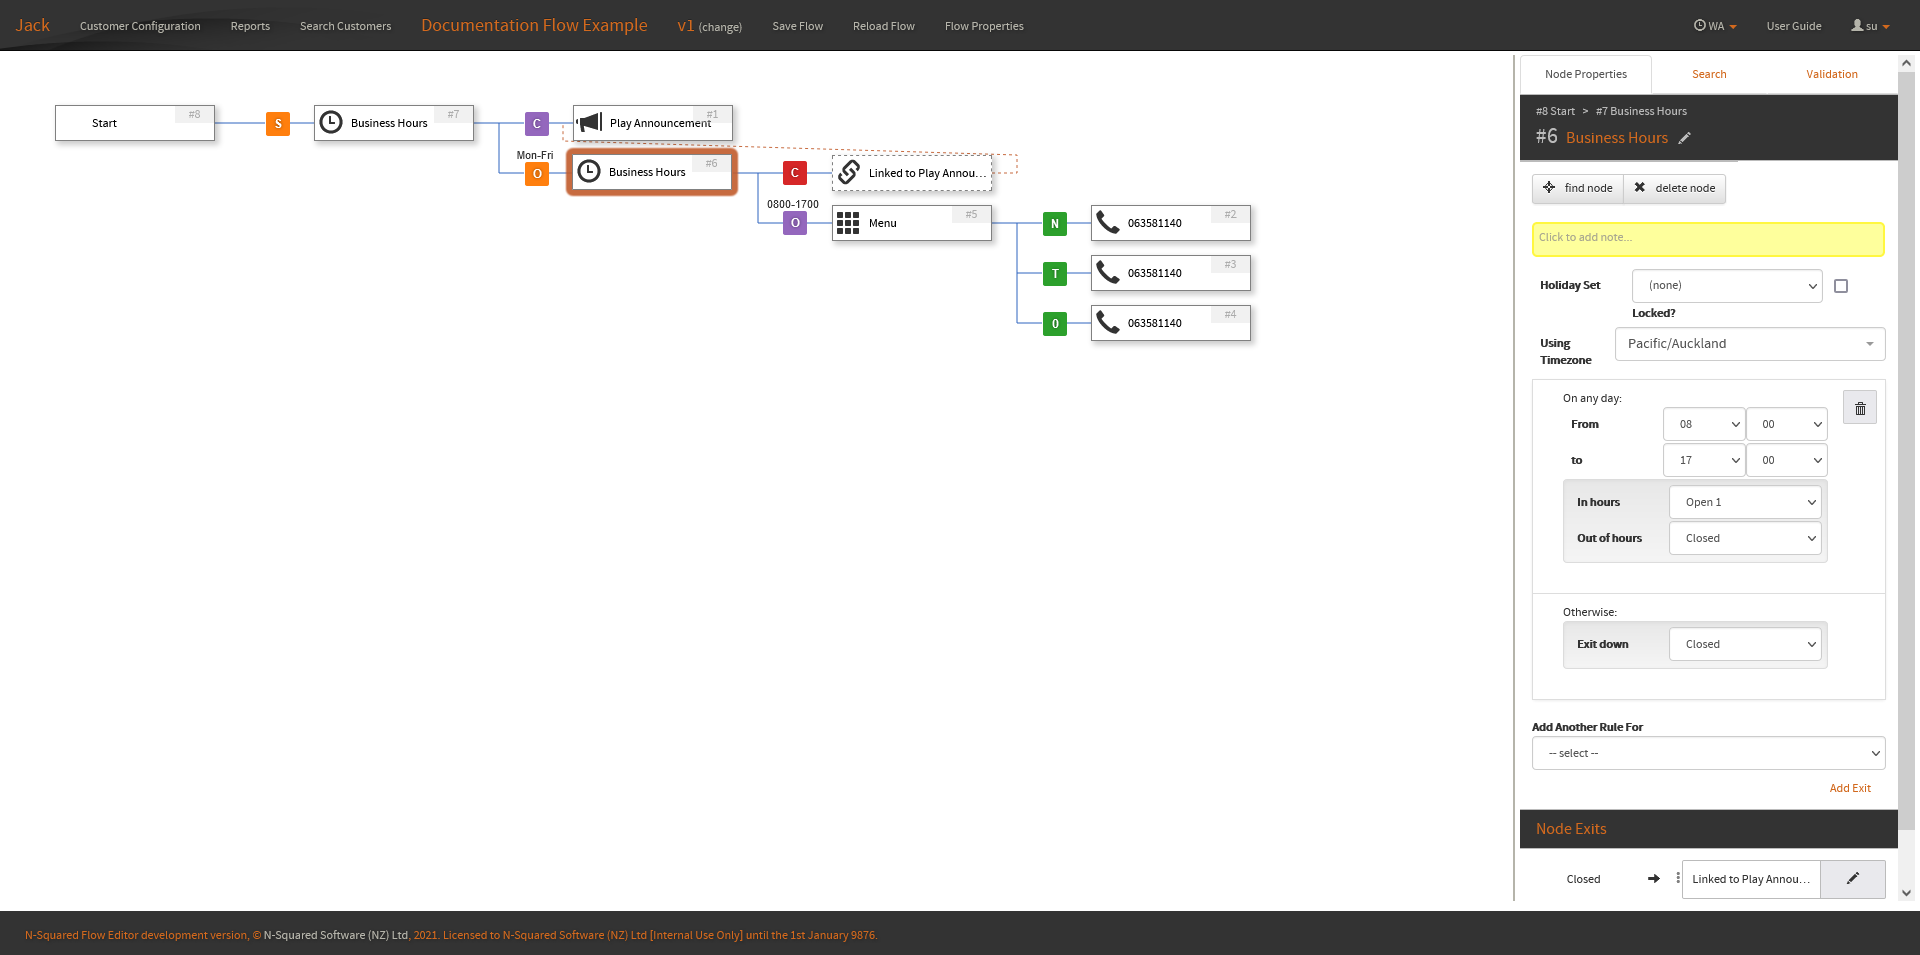
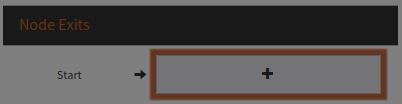
All node property editing is performed in the properties display shown in the right panel. When beginning a new flow, the flow will present a Start node.
Moving Around
To move around a flow, click and drag the canvas by clicking on any part of the white background where the flow appears, and (while holding the mouse button down), drag the mouse in the direction you want the flow to move.
You can also centre a node in the canvas by clicking on the node. The title bar is the area of the node which displays the node’s name and node number.
To recenter on the selected node, press Control + h;
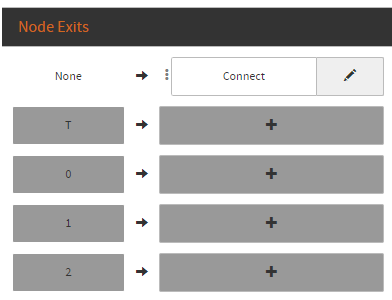
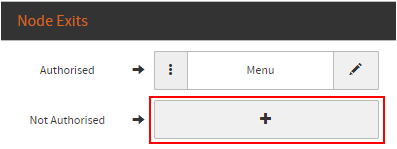
You may follow a branch of a node by clicking on the node exit. The node exits are shown on the right of each node, with a node exit name (exit names depend on the node type and are often context specific).
In this example, clicking Connect will take you to the connected Connect node:
Adding New Exits
Some nodes have the ability to add additional exits to the node, the method of adding an exit may change from node to node.
After selecting a target node, press Control + e to add a new exit to the end of the current exits. The node must support adding a new exit.
To remove the last exit, press Control + Shift + e while selected the target node. The last exit will only be removed if that exit is empty.
Flow Versions
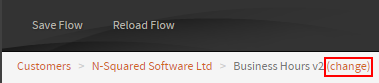
When viewing a flow, you may also change the version of the flow you are viewing
by selecting the change button located next to the flow version in the title bar of the flow designer:
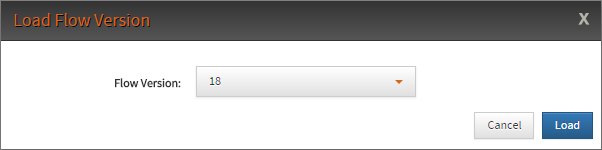
The Flow Version option allows you to select the version of the flow to view or edit:
Saving Flows
A node may be saved by clicking the Save Flow button in the title bar, or by pressing Control + s.
Before saving, the server performs validation checks on the flow configuration. If any issues arise from the validation the issues will be shown in the Validation Tab in the Sidebar.
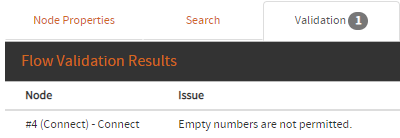
A flow may not be saved while validation errors remain.
When saving, you may choose to save the flow with a new name, or (if relevant), keep the existing name.
Node Anatomy
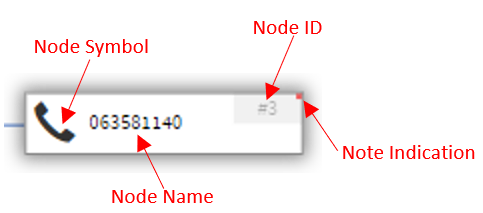
Compact Flow nodes consist of 4 sections
- Node Symbol: an icon that is used to represent the node.
- Node Name: the name of the node. The name can be changed in the Sidebar.
- Node ID: the unique number (within the flow) for this node.
- Note Indicator: an indicator used to show that a node has a note attached. Hovering your mouse over the Node ID will show the node’s note in a small dialog.
Sidebar Anatomy
The Sidebar is the main way of interacting with nodes.

Node Properties
The Node Properties shows the information related to the currently selected node.
There are five sections within the node properties.
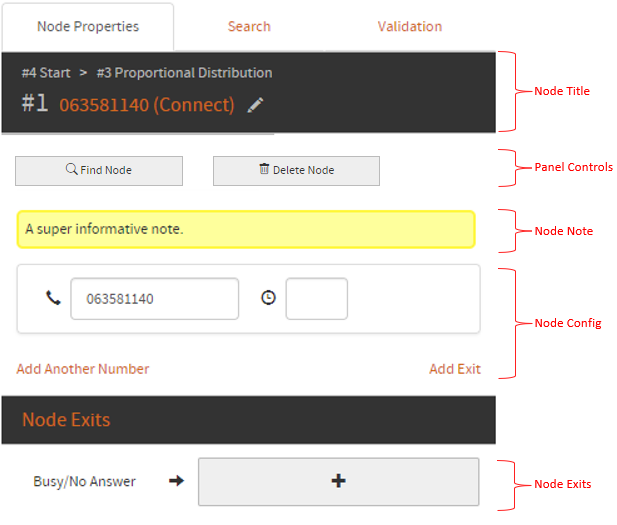
- Node Title
- The top half of the Node Title is the breadcrumb to the current node.
- The breadcrumb shows the path from the Start node to the currently selected node.
- Clicking on any node in the breadcrumb will focus on the selected node.
- The bottom half of the Node Title is the currently selected node’s ID and name.
- The name can be changed by using the pencil to the right of the name.
- If the node has a custom name, the node’s default name will appear in brackets next to the custom name.
- The top half of the Node Title is the breadcrumb to the current node.
- Panel Controls
- Find Node
- Selecting Find Node will focus on the currently selected node.
- Delete Node
- Selecting Delete Node will give you the option to delete the node.
- Find Node
- Node Note
- The node note is a text area for adding any information you wish to the currently selected node.
- If the node’s note has any text in the text area, a small graphical indication will be shown on to the right of the Node ID in the flow.
- Node Config
- This section shows the configuration options related to the currently selected node.
- Each node has different configuration options - refer to each node’s page for information on the available configuration options.
- Node Exits
Note that some nodes may hide advanced configuration items by default. Such nodes have a Node Title with an additional button shown:
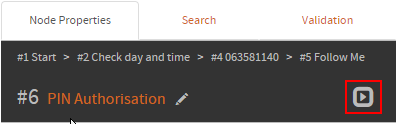
This button will toggle whether the advanced configuration is shown.
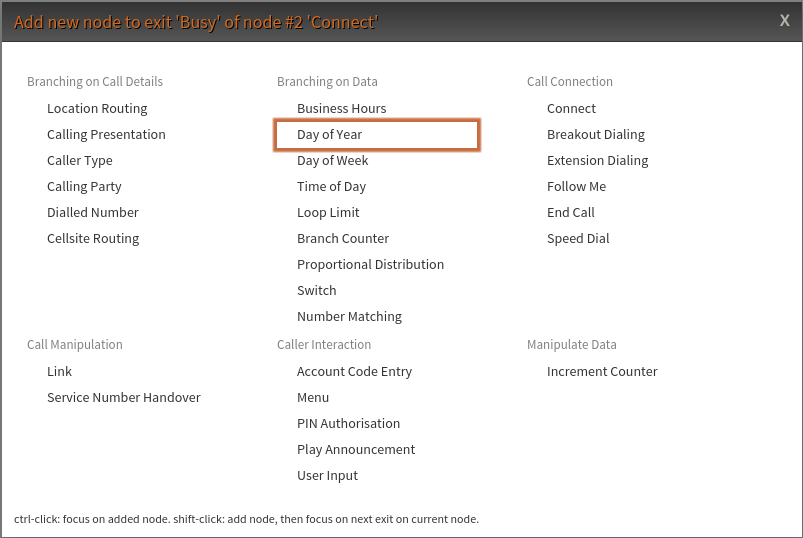
Adding Nodes
To add a new node, select the node that you wish to add an exit to and click the + button next to the node exit you wish to add a node to.
In addition, with the target node selected, press Control + g to open the add node dialog and select the first exit as the node
exit to add a node to.
Upon clicking the + button or pressing Control + g, the add node dialog will appear with the available nodes, grouped by
the node’s Node Category.
Selecting a node from this dialog will add the node to the selected exit.
An orange border will appear around the exit the new node will be added too.
The following keybinds allow the target exit to be changed.
| Key | Functionality |
|---|---|
| Control + Up | Will change the target exit to the exit above the current target. |
| Control + Down | Will change the target exit to the exit below the current target. |
Modifying the Exit Node
To modify an exit node, click the pencil icon next to the desired exit node.

Clicking the pencil icon will bring up the same add node dialog used in the Adding Nodes section.
Once a node is selected, the new node will be placed between the selected node and the pre-existing node after the chosen exit.
If the node being added has more than one exit, a dialog will appear asking you to select which exit the existing node should be added to.

If the new node or the existing node is a Link Node, the existing node will instead be replaced.
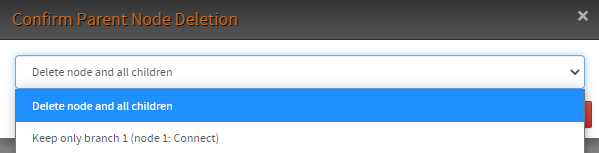
Deleting Nodes
To delete a node do one of the following while having the target node selected:
- Press the Delete Node button on the sidebar.
- Press the
deletekey.
If the node to be deleted has nodes after any of its exits, a deletion confirmation dialog will appear, giving the option to either cascade the deletion to all node exits, or replace the node being removed with the node after one of this node’s exits.
Add Node Dialog
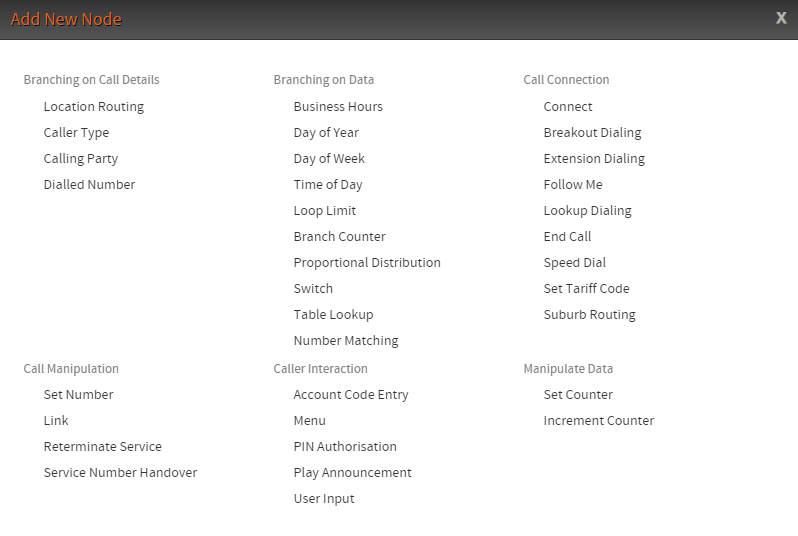
The add node dialog is used to select a new node to be added to the flow.
Pressing the arrow keys will select a node type within the Add Node Dialog in the direction of the key.
Clicking any node type, or pressing enter when with a node type selected will add a new node of that type to the selected exit.
To help in quickly creating large flows, modifier keys may be held down while selecting a new node:
| Key | Functionality |
|---|---|
| (no key) | Close the add node dialog and remain on the current node. |
Control |
Close the add node dialog and focus on the newly-created node. |
Shift |
If the current node has empty exits remaining, keeps the add node dialog open. Selecting another node will add that node to the next empty exit of the current node. |
Control + Shift |
Focuses on the newly-created node and keeps the add node dialog open to allow another node to be added to the first exit of the new node. |
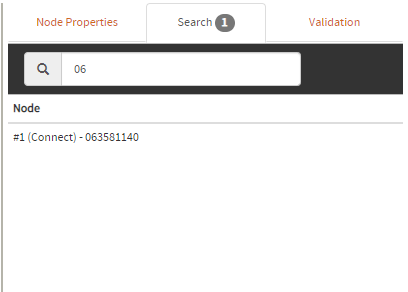
Search
The search tab is useful to quickly find specific nodes. Entering text into the search bar and pressing enter will display a list of nodes matching the given search term.
The search term will be checked for matches against:
- The Node ID.
- The current Node Name.
- The default Node Name.
You can switch to the search tab at any time by pressing Control + f
| Key Combination | Functionality |
|---|---|
| Ctrl + Up Arrow | Highlights the proceeding node within the results. |
| Ctrl + Down Arrow | Highlights the succeeding node within the results. |
Validation
A flow may be in a state where it may not be saved due to missing or invalid configuration.
When modifying and saving a flow, the user interface will perform local validation on the flow, ensuring that all basic validation requirements are met. The total number of issues will show on the sidebar tab.
Validation can be run at any time by pressing Control + b.
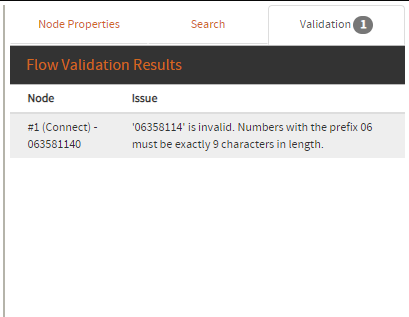
Any validation errors should be resolved before attempting to save the flow again.
For information on how to resolve individual validation errors, consult the documentation for the specific node type.
To quickly get to the errored node, simply click the issue and the node in question will be selected and focused.